• 500px
  • facebook
  • flickr
  • instagram
  • linkedin
  • rss
To wear a dead bird’s wings…

To wear a dead bird’s wings…


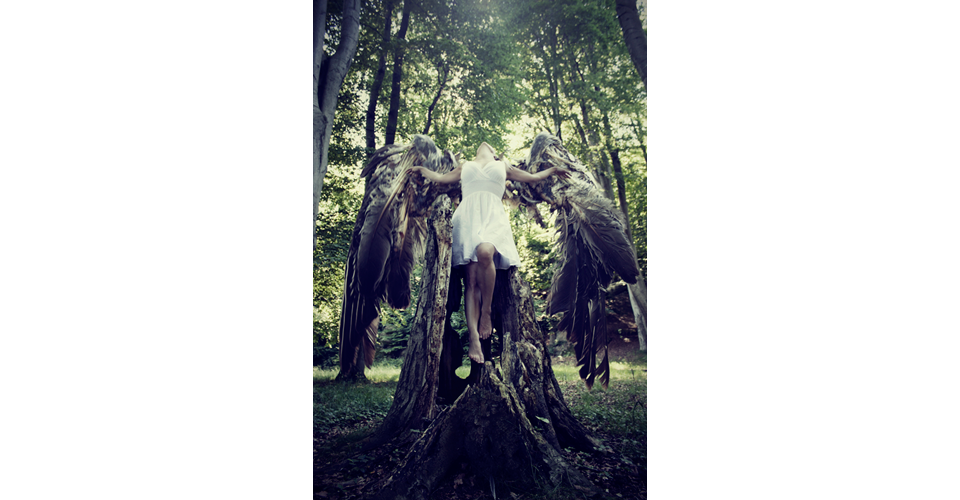
Welcome to my very first Behind the Scenes! “Broken Wings” derives from a summer’s day when I was taking a walk and my eyes got caught on these semi-decomposed bird wings among the leaves on the ground. And my instinct was of course that I had to wear them! Even though they would only fit a person 40 cm tall…

dead, bird, wings, decomposed, rotten

But since I’m a very stubborn girl I resisted the terrible stench reeking out from them, poked sticks under the “armpits” of the post-bird, and walked around the forest to find a good location.

Luckily it didn’t take long before I ran into this tree stump. The stump was big enough to fit me in it and also it provided a good spot for a levitation trick. Even though the wings were broken I had to at least try to fly with them.

Below, I’ll take you through both the SHOOTING PROCESS and the PHOTOSHOP PROCESS

SHOOTING PROCESS

So I needed three shots to be able to create a girl with wings trying to fly from a tree stump.

1) THE UPPER BODY AND ARMS I put my camera on my tripod, climbed the stump and flung around it in different positions, shooting myself using my Canon RC-1 wireless remote control. Climbed back down, ran to the camera to check on the poses and angles, and ran back to the stump to create better ones. This kept on until I felt like I had been through a tough yoga session and I had a shot I was happy with.

levitation, self portrait, post-processing, Photoshop, conceptual, bird, fly, take off, forest, Behind the scenes levitation, self portrait, post-processing, Photoshop, conceptual, bird, fly, take off, forest, Behind the scenes

2) THE LEGS To create that levitation look I needed to lift my legs off the stump, not touching it at all with my legs. So back up on the stump I let myself into the same position as in the shot I had chosen, held my body up with my arms and released the legs.

3) THE WINGS were a lot trickier since they were so small (and also very fragile and risked of falling apart any second). Still having the wings on sticks, I first tried to get the correct perspective by putting the wings in the proper place behind the stump with the aim to increase their size later on. Although, I wasn’t happy with the details so instead I tried to lift them in front of and close to the camera. For this part it is very important to keep the same focal length even if the subject is moved around. I was happy with these images and I was done shooting.

levitation, self portrait, post-processing, Photoshop, conceptual, bird, fly, take off, forest, Behind the scenes levitation, self portrait, post-processing, Photoshop, conceptual, bird, fly, take off, forest, Behind the scenes

Let me make a note that all this was going on with people walking by… looking like they were going to call the police for them to come get that crazy bird woman running around in the woods with wings, looking like she would need a strait-jacket…

PHOTOSHOP PROCESS

In Photoshop I combined the two images of the girl in the forest by using the first shot as a main layer, masking over “the wrong legs” and letting through the levitated legs from underneath with some modifications.

levitation, self portrait, post-processing, Photoshop, conceptual, bird, fly, take off, forest, Behind the scenes levitation, self portrait, post-processing, Photoshop, conceptual, bird, fly, take off, forest, Behind the scenes

After that I cut out one wing at a time, pasted them on the forest image, corrected their positions and angles and let the arms and body of the girl in front of the wings.

levitation, self portrait, post-processing, Photoshop, conceptual, bird, fly, take off, forest, Behind the scenes levitation, self portrait, post-processing, Photoshop, conceptual, bird, fly, take off, forest, Behind the scenes

For me the story is sad and moody, so I wanted the tone and color of the final image to convey that feeling. I worked with blues and darks and decreasing the yellow in the greens. Some more tweaking and adjustments and VOILÀ!


BROKEN WINGS

Broken wings

A lot of work, full of aches, and marked as a crazy bird woman, but at least I got to wear a dead bird’s wings…


MY TIP FOR FURTHER READING!
Image Processing - Thumb
If you are curious about image processing and what can be done in Photoshop, I’ve got more detailed posts for you!

I’ll continuously let you in behind the scenes of how I make people levitate, turn day to night… etc.


DO YOU WANT MORE TIPS ON PHOTOGRAPHY AND POST-PROCESSING?
Connect with me on Facebook for upcoming news!


SHARE THIS AND SPREAD THE LOVE
FacebooktwitterpinterestlinkedintumblrFacebooktwitterpinterestlinkedintumblr

Newer Post | Previous Post

19 Comments

  1. Erik · August 15, 2010 Reply

    Den här posten var riktigt bra – jag känner mig redan omkörd. Fack!

  2. FANTiM · November 11, 2010 Reply

    Very gross. But 1000 times worth it. The final shot looks so great.

  3. htc one sprint · May 12, 2012 Reply

    I have been looking around your webblog for quite a while and subscribed for your Really simply syndication feed, awaiting more updates!

  4. abhishek · January 7, 2014 Reply

    This was verry impressive can you please tell how did.you manage to get your hands above the winga when you pated the wings on he 1st layer

    • jennyjacobsson · January 7, 2014 Reply

      Hello there abhishek,

      First of all, thank you for commenting! I’ll do my best to keep adding interesting work in the future to engage and inspire :)

      To answer your question about how I got my hands above the wings; I always work in Photoshop to edit my image. In Photoshop I put the image with the woman in one layer and the image with the wings in a second layer above the first layer. For that second layer, I added a layer mask and painted with a black brush in the layer mask to mask out the wings where I wanted the arms and body to be visible.

      I hope that helps. I look forward to more questions in the future!

  5. Kusum · February 25, 2014 Reply

    Amazing shot ma’am..really…a huge fan of your work..i am just a rookie in the world of photography..looking forward to learn a thing or two from you..thank you for sharing.god bless you

    • jennyjacobsson · February 25, 2014 Reply

      Thank you so so much for your kind words. It warms my heart to hear that I can be of any inspiration to you. I’ll do my best to keep posting great content for you :)
      Cheers,
      Jenny

  6. Levitation Photography: 65 Stunning Examples & Tutorials - Hongkiat · March 5, 2016 Reply

    […] is simply epic. Respected the hard work of the photographer too, you can probably check out the entire process behind this epic shot. (Image Source: Jenny […]

  7. Broken Wings | Fiat Ducato · May 15, 2016 Reply

    […] to have on dead chook wings…. xxx For a Guiding the Scenes of Broken Wings, pay a visit to my Pictures Web site! On Jenny Jacobsson Pictures on Facebook you may discover all goodies of my pictures as effectively […]

  8. Levitation Photography: 65 Stunning Examples & Tutorials - Hongkiat · November 9, 2017 Reply

    […] is simply epic. Respected the hard work of the photographer too, you can probably check out the entire process behind this epic shot. (Image Source: Jenny […]

  9. Levitációs fotózás: 65 lenyűgöző példa és oktatóanyag - Driveria.net · May 7, 2022 Reply

    […] ez egyszerűen epikus. A fotós szorgalmas munkáját is tisztelve, valószínűleg megtekintheti a az egész folyamatot az epikus felvétel mögött. (Kép forrása: Jenny […]

  10. Levitaatiovalokuvaus: 65 upeaa esimerkkiä ja opetusohjelmaa - Driveria.net · May 7, 2022 Reply

    […] on yksinkertaisesti eeppistä. Kunnioitetaan myös valokuvaajan kovaa työtä, voit ehkä tarkistaa koko prosessi tämän eeppisen kuvan takana. (Kuvan lähde: Jenny […]

  11. Photographie de lévitation : 65 exemples et tutoriels époustouflants - Driveria.net · May 7, 2022 Reply

    […] épique. Respecté le travail acharné du photographe aussi, vous pouvez probablement consulter le la procédure Complete derrière ce cliché épique. (Source de l’image : Jenny […]

  12. Levitationsfotografering: 65 fantastiske eksempler og vejledninger - Driveria.net · May 7, 2022 Reply

    […] det her er simpelthen episk. Med respekt for fotografens hårde arbejde, kan du sikkert tjekke ud hele processen bag dette episke skud. (Billedkilde: Jenny […]

  13. Levitatiefotografie: 65 verbluffende voorbeelden en zelfstudies - Driveria.net · May 7, 2022 Reply

    […] dit is gewoon episch. Respecteerde ook het harde werk van de fotograaf, je kunt waarschijnlijk de het gehele proces achter dit epische shot. (Afbeeldingsbron: Jenny […]

  14. Levitační fotografie: 65 úžasných příkladů a návodů - Driveria.net · May 7, 2022 Reply

    […] je prostě epické. Respektoval i tvrdou práci fotografa, pravděpodobně se můžete podívat na celý proces za tímto epickým záběrem. (Zdroj obrázku: Jenny […]

  15. 懸浮攝影:65 個令人驚嘆的示例和教程 - Driveria.net · May 7, 2022 Reply

    […] Wings. 好吧,這簡直就是史詩。 也很尊重攝影師的辛勤工作,你可以看看 整個過程 在這個史詩般的鏡頭背後。 (圖片來源: […]

  16. Schwebefotografie: 65 atemberaubende Beispiele und Tutorials - Driveria.net · May 7, 2022 Reply

    […] episch. Respektiert die harte Arbeit des Fotografen auch, das kann man sich wohl mal anschauen gesamter Prozess hinter dieser epischen Aufnahme. (Bildquelle: Jenny […]

  17. Levitation Photography: 65 Ví dụ & Hướng dẫn Tuyệt đẹp - Driveria.net · May 7, 2022 Reply

    […] thi. Tôn trọng công việc khó khăn của nhiếp ảnh gia, bạn có thể có thể xem toàn bộ quá trình đằng sau cảnh quay hoành tráng này. (Nguồn ảnh: Jenny […]

Leave a reply

This site uses Akismet to reduce spam. Learn how your comment data is processed.